Friday, March 30, 2012

The Thrill of Pole Position and the Agony of....


We brought our Art Car to the first Lotus Cup USA event last weekend with our friend, Glen Irani, our partner and driver this year.  Glen has been competing in LCU since the first season with his NA Elise.  He is a talented driver who has won his class and frankly is known for his aggressive style and out-right speed.  Plus he is a cool guy who beat cancer last year and is building back his strength and focus in the car.  He is driving our Art Car to help us push the parts we are developing, in race conditions.

Our goal is to prove that a well balanced Elise can compete against cars like 211s and highly modified Exige Cup cars.

The Thrill
If the results of this weekend are any indication, we've got the Cup cars covered with seconds to spare and are giving the 211s a run for their money...Glen set the fastest lap of the entire weekend with a 1.54.7 sec blast around Chuckwalla Raceway.

Starting the race in Pole Position on Saturday exceeded our expectations as the field included five 211s including one GT4 car.  Two of the 211s were driven by very experienced and talented LCU drivers who typically are the pole sitters and have won LCU championships.  So we're happy to report that we ran with some very qualified drivers with very well sorted 211s.

The Art Car
Glen, like us, believe that the Elise is a great platform as it is lighter than an Exige and has better aero potential than a 211.  We aren't delusional enough to think that the Elise is better than a 211 - we just think we can compete.  So what was on our Elise to make it competitive?  Our car weighed 2020lbs with driver & a full tank of fuel.  It makes 243 rwhp (see Dyno).  Here's the list of tasty bits:
  • Proven Parts: KATANA265, Nitron Race Pro 3-Way, 308BBK + FCRbracket, RACEunderAERO, ReVerie: 1700x200mm rear wing, XC seat, Steering wheel, Canards, Side scoop, transCOOLER, subSTIFFY, ULTRAdisc, Carbotech pads (XP12 & XP10), AiM race pack, R3cage, DSbrace + S99pins, OSGiken LSD, Drexler gears,  Fidanza V2 Clutch & Flywheel, proRAD, coolantHOSES, CF hardtop, FIAtank, raceVIEW mirror, Spec Elise Clams   
  • New Parts: 

    • Dry Sump: We've been successfully running this Dailey Engineering/S111 developed solution for several months with great success.  We ran the car without the twin oil coolers and saw a max of 259degF (80degF Ambient).  We will add a cooler when ambient temps start climbing.  We are offering this kit to experienced shops.  If you are interested, please contact us.
    • raceUPRIGHTS: This new upright solution was engineered by my friend Dennis@Palatov Motorsport.  It is designed to allow us to run lower ride heights than stock.  We ran our car at 102mm(F) & 110mm(R).  They also allow us to run less camber than is typically required.  We were very happy with the performance.  These uprights allow you to bolt stock brakes, hubs, steering arms, toe links onto it.  They are a very cost effective kit and will be available soon.
    • Delrin Wishbone Bushes:  We developed this bush solution to deliver the stiffness required by slick tires with better resistance to adverse weather conditions.  Similar solutions are used extensively in off-road racing and perform well in dusty and sandy conditions.  These bushes are also more affordable and very easy to install.  They are working well.
    • ETHOS 16x7 & 17x8 Wheels: We are very happy with the quality of the ETHOS and feel they are a great value for racers.  Two other 211 owners were running these wheels this weekend.  I expect to see more clients pick them up as they are light, strong and affordable.
    • TRACKpipe: Our new muffler has been on our car for several track events.  It is another great value solution that we are offering.  The sound is great and we think clients will find it to be a good solution.
    • DSbrace: Our new toe link brace has been run now for several track events.  It uses the tried and true parts from our RTD2brace in a lower cost solution.
    • Nitron Hydraulic Spring Perch: We installed two of these adjusters onto our Nitron shocks and they allowed us to corner balance our Elise quickly and easily.  These perches use hydraulic pressure to adjust ride height on the Nitron with a simple knob.  We will be offering them shortly in both diameters for fitment to any Nitron shock we've sold.  They are an excellent solution for any racer who spends time adjusting his corner balance.   
    • raceRACK: Our faster (2.2) race-oriented steering rack continues to run well.  Production parts are now in being built for us by Titan.  The car does not feel nervous with this rack.
The Agony
That sounds a bit dramatic but we suffered a broken stock shifter on our car at the start of the first race - luckily we had run several session before with no trouble and set the fastest time of the day.  Murphy's Law?! This shifter is one of the pre-recall shifters.  You can tell if you have one by its hexagonal cross section.  The upgrade has a round cross section.  

This car was a Lotus Press car so it is a shame it did not get the update - but in the end, we are at fault as we missed upgrading the shifter.  Shame on us, though the driver gets some of the blame as well...;^)  John did a great job of welding up the shifter so that Glen could run on Sunday.  Special thanks go out to Jim@LCU who is sending us an upgraded shifter so we can fix the Art Car properly!

Of course when you race a car, it sees significantly higher stress than street use.  We had a couple of other issues that popped up.  On Sunday the SSC shifter cable housing failed and the Art Car was stuck in 5th gear for the second half of the race.  Glen did a great job of keeping the car competitive and ended up with a 4th place finish overall finish.  

Additional 'challenges' included some poor fuel management by us which resulted in fuel starvation.  Our FIAtank is the original test tank that lacked some bleed holes so the fuel stays captured within the baffled area that holds the fuel pump.  You could say it traps the fuel too well!  The lack of a bleed causes the fuel gauge to read higher than the actual amount.  We've corrected this in the production tanks by adding some bleed holes in the baffle that allow fuel to level out slowly when it sits in the pit.  We also suffered some tire balance issues that we are still sorting now.  Initial evaluations did not prove conclusively what caused the issue.  

The Conclusion
Overall the team, John, Matt & Glen did a great job at this first event.  We proved that an Elise can be made fast with moderate levels of power.  Our Art Car showed great promise and we plan to come to the next event at Buttonwillow with a car that is ready to take on the 211s once again.  I also want to thank the Lotus Cup team, Jim and Robbie.  They are working hard to create a great venue for Lotus competition.  They are doing a great job - running any race series is a challenge and they are doing a fine job.  Stop by the Lotus Cup website and learn more: HERE.  


Monday, March 26, 2012

Brake Flush is Necessary: fact or fiction?


Spring is upon us and with it comes maintenance, especially for those of you in colder climates where your cars have been in hibernation for the last few months. Most Lotus/Ariel owners perform the required maintenance, but many overlook one very important service: the Brake Flush.  This service is very important for modern vehicles with complicated ABS systems. The fluid sitting idle in the system likely holds moisture and contaminants and should be replenished.  Why?  The water will expand when it gets hot causing brake fade and poor feel/performance - especially on track.

  You may be wondering how water/moisture enters the brake fluid. It's very simple: most automotive brake fluid with the exception of DOT 5 (which is a silicone based fluid) is hygroscopic. This means it has the tendency to attract and absorb moisture from the atmosphere.

  So, how can you tell if your car needs a brake system flush? They make special test strips which can detect high levels of moisture present in the brake fluid, but I prefer the old-fashioned eyeball method, personally. Remove the brake master cylinder cap and visually inspect the condition of the fluid. Brake Fluid should be clear or with a slight yellowish-tint.  Black or dark colored dirty fluid should be changed out. You can also test it with a refractometer or a fancy electronic tester.

  My personal recommendation for street-driven cars a biennial flush (every 2 years) but if you are taking your car to the track frequently, adjust accordingly.  Sector111 recommend at least once per year for a track oriented car.  If you are racing, we suggest even more frequent flushes...we've been very happy with Motul RBF600.  

Friday, March 9, 2012

Measuring Ride Height

Setting ride height is especially important to ensure your car handles correctly. Ride height is crucial when setting up your car. Lightweight cars are very sensitive to proper set-up and the right height is a key criterion that should be managed carefully.
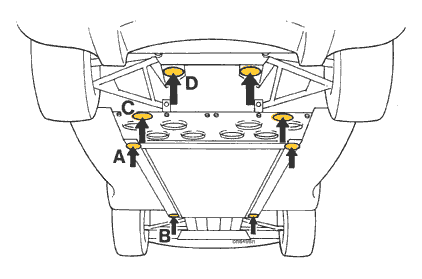
First, pick a spot to measure from. The best spots to measure ride height on a Lotus are from points A and B shown in the above picture. Make a mark where you measure the first time, so you can check the same exact spot each time thereafter. Being precise in your measurements matters and the little details are key.

We measure ride height with a telescoping gauge. When measuring the gauge, use a digital micrometer if possible, as this is much more precise than a ruler. Above, you'll see a picture of the front of the car, and as you can see, in this position it is very easy to access and not touch the car.

This is the point at the rear of the car where we measure. Once again, it is in a spot that is easy to check and where you're not at risk of touching the car.

This can be a long and tedious task. Be patient. Remember, details and precision matter when setting a car up for the track. We believe that the correct setup is one of the most important things you can do to ensure you have a fast car.
Here are some other tips as you plan on setting your ride height:

  • Make sure tire pressures are set at your preferred track pressures
  • Make sure your suspension is settled before checking anything
  • Try not to touch your car after settling it
  • Fill up your fuel tank so that it is full

Wednesday, February 29, 2012

Wide Tires Can Be Bad!

As more power is added to our cars, we naturally look for more rear traction.  Wider rubber with wider wheels becomes the natural solution.  Ensuring you have good clearance is important as you can rub many different parts on your car, including:

  • Fenders
  • Wheel well liners
  • Wishbones
  • Suspension
  • Chassis
Remember your tire (maybe even you wheel!) can flex under heavy cornering loads.  This reduces your clearance so it is critical that you leave room.  

The picture above shows a Nitron race shock that has a remote reservoir attached by a hose.  This joint can come in contact with an improperly sized wheel/tire combination.  

Recently we learned that a Lotus owner knocked this hose loose and lost his shock performance at the track.  He blamed the clip that holds the hose fitting to the shock.  We've never had any failure from this design but recognize that if something rubs it - like a tire - it could come loose.  Frankly, we think properly sizing your tire is the correct solution.

Recent track testing of our ETHOS 17x9 with 245 Hoosiers revealed that we were rubbing the outside fender.  Adding ReVerie rear fender flares would resolve this completely.  We will be adding these fenders soon to test but for now, we would admonish all y'all to watch clearance when adding wider wheels or tires to your Lotus!

Tuesday, February 28, 2012

Wheel Offsets and You

Wheel Offset is the relationship of the wheel center line to the mounting flange of the wheel, as seen in the picture below.

Manufacturers determine offsets by taking several aspects into consideration; such as:

  • Fitment - the given space of the wheel well during all conditions of wheel movement; whether that be the up and down motion of the suspension or the turning of the front wheel during steering.
  • Styling - cars just look better with the wheels somewhat flush with the outer fender line of the wheel well.
  • Performance - cars have a tendency to handle better with the wheels pushed out away from the center line of the vehicle.
The Lotus & Ariel have positive offset wheels with wheel bolt spacing that is unusual.  Spoke clearance from the caliper is a challenge with both of these cars as they use opposed piston calipers.  We developed many different wheels for these cars and generally have found that reducing the offset - which pushes the wheels outwards, has helped handling. Generally pushing your wheels out by 5mm works well on these cars.  

Tuesday, February 14, 2012

Don't strip it!

The undertray and diffuser are parts on our vehicles that need to come off a lot; whether that be for making repairs or just to check for leaks, tears etc. However, the stock undertray bolts can make this a real pain.

The stock undertray bolts are button-head alleys which can strip. The problem usually stems from improper use.  An allen head bolt starts to strip from overtighting them, or not putting the allen key all the way inside the head of the allen bolt. (This goes for all allen heads. Not just the undertray and diffusers. Allens are used alot on these cars, so pay attention that your key is all the way in when removing and be careful not to over-tighten.)  Conversely, if you do not remove your undertray much, the bolts start to seize inside the hole, due to rust.

One of the easiest ways to get them out, without drilling, is to get a cutoff wheel and cut a straight line through the head of the bolt. Use a punch and hammer, and tap the bolt in the direction to loosen it. You can try to use heat, but the undertrays are very sensitive to torches due to the material and the fact that it's so thin.

The easiest way to avoid all of this: replace the button heads with a standard hex head and add a little Anti-seize. You can purchase these bolts at any hardware store (M8-1.25x25 for both the undertray and diffuser). The only way to strip these bolts is by using the wrong size tool. Even if these do seize in the hole, they will come out with a standard wrench.
Highlighted in red are two of the bolts and where they should be replaced.
Working on these cars for as long as I have, and repeatedly seeing this issue, I started to change these bolts on any service, or, any time i had to remove the undertray or diffuser.


Here's a chart that is a great guide for torque specs.
http://www.imperialsupplies.com/pdf/A_FastenerTorqueCharts.pdf


Thursday, February 2, 2012

Have you inspected your MAF lately?

Modern Fuel Injection engines require the measurement of the air into the engine.
The common Mass Air Flow sensors available include:
  • Hot Wire
  • Vane Type
  • Hot Film
  • Karmen Vortex 
  • Speed Density
 The MAF found on the Lotus is of the Hot Wire type.

   Most common hot-wire MAF sensors use a platinum wire or filament heated to a prescribed, maintained temperature above ambient, located centrally in the incoming air stream. These sensors function on the electrical principle that resistance decreases with temperature. As intake air moves past the wire or film, the cooling effect causes a measurable drop in resistance, and thus lower voltage is required to maintain the prescribed temperature. The hot-wire MAF control unit is sent a reference voltage of 5V, and returns about .4V to.5V at idle and from 4.5V to 5V at full throttle. Based on a fixed data set, an accurate assumption of air mass is made. 

  However, when these sensors become contaminated, they can send false readings to the Engine Management system and cause driveability issues. 

Cleaning these sensors is quite easy and can restore performance to your engine. You will need Mass Airflow Sensor cleaner. Do not use anything other than this, as other cleaners (ie. Brake or Carb Cleaner) can leave residue on you sensor


After cleaning, you should not see any dirt and that the wires are clean.


Tuesday, January 31, 2012

Make Sure Your Radiator Hose is Fully Attached

One of the important issues of any engine is keeping your engine at the right temperature. One of the best ways of doing that is making sure it won’t leak!  Coolant leaks are caused by radiator failures, leaking reservoir bottles, old hoses or improperly installed hoses.  This post discusses hose related issues.


1. Check your hoses to see if they are in good shape.  Over time the stock hoses will start to crack and split, some start to swell etc. With our cars starting to get up in age, it is never a bad time to replace hoses or at least have a closer look at them. 


2. Make sure your hoses are on correctly. A lot of leaks occur at the two front hoses that bridge the hard lines, to the radiator. Generally it is caused by hoses that are incorrectly installed. This is the area where the car is drained for coolant flushes.  One of the reasons is because the hard line is so close to the crash structure, and with such little flex from the coolant hoses, it is hard to get the hose clamp in the correct position because it almost pinches the clamp against the crash structure and with the stock coolant hose being so stiff, it is hard to see where the flange on the hard line is. There is also a little movement from the hard line when trying to push the factory coolant hoses back on, which causes you to not be able to get the hose on enough of the hard line needed for a proper seal with the stiffness of the factory hoses. 

We run silicone hoses and they fit great. They are very flexible which makes it easier to put the hoses on.  They slide right over the flange and allow almost no movement from the hard line.  This lets you get the hose clamp on easier and in the correct position.  Since they are flexible, they also allow you to see exactly where the flange is and that helps make sure your clamp is in the correct position and your hoses are safe and secure.  

Thursday, January 19, 2012

Single vs Double Shear Explained

We know the rear toe link joint is a weak point in the Elise/Exige - mostly with track driven cars.  There is a misconception that the toe link is weak - it is actually the joint where the stock balljoint meets the subframe.  This blog entry discusses how we reinforce the joint, with our new DSbrace and RTD2brace, by placing it into Double Shear.  
The easiest way to explain the differences between Double & Single Shear is to think of when you were a child and fighting over a stick or piece of wood with a friend.  He grabs one end, trying to pull it out of your hands, the stick starts to go back and forth, you can hear it starting to crack and then you grab the other side of the stick putting his hand in the middle of your hands. He keeps pulling as hard as he can, but you have full control and there is no more tension on the stick. His force with one arm is now dominated by the strength of your two arms. Now, replace the stick with a bolt, and you and your friends arms are metal rods. The same applies to the bolt as it would the stick. 


The strength of a Double Shear joint is effectively double of a Single Shear joint.  Here is a picture that helps illustrate the shearing actions: