Tuesday, November 20, 2018

111RS Spyder Build: Part 1

We are building a new Lotus Elise Spyder and I wanted to start blogging about the work. This car is based on an Exige S240 and will feature many of our mechanical upgrades. We have a brave client, Shane, who has agreed to be our sponsor and I can’t think of a better client to work with. Shane has owned many cool cars including an Elise, Atom3, GTR, and more.

Our inspiration

Our inspiration

We love light cars and the Lotus are from the factory, very light. Drastic measures are needed to really shave weight from these cars. Our donor Exige S240 had rolled on track so was in need of new bodywork so we got thinking…this sketch below came from one brainstorm with a designer Sergio.

cropped sketch.jpg

We decided to run with this rally inspired style and landed on the following renders from our friends at RogueCollective.

111RS Spyder Homepage3.jpg
111RS Spyder Homepage2.jpg

Friday, October 12, 2018

Repair Your Lotus Marker Light

unnamed.jpg

The Lotus Elise/Exige marker lights suffer from broken posts that attach it to the clam. These plastic posts can snap when an overzealous hand tightens a bit too generously. Replacement parts are getting harder to find so repairing your broken part is often the best option.

Carlos has come up with this great idea that will allow you to fix your light. The basic steps are as follows:

  1. Cut off the broken post - flush with the base
  2. Drill a hole where the post was located
  3. Use a coarse threaded screw with an appropriately sized washer to attach the light to the clam

Please see the picture below for better clarity on this tweak.

marker light.jpg

Monday, September 3, 2018

Brake Pad Types and Bedding Pads/Rotors

Evora Rear Rotor Vents.jpg

Brake pad selection is often a tricky affair.  A pad that works well for one person may not be good for another.  It is good to understand the different types of brake pads along with bedding in procedures.  This blog attempts to shed light on these areas to better allow the reader to make the best choice.

There are 2 types of brake pads; those with abrasive friction and those with adherent friction

  •  Abrasive friction simply means the brake pad provides friction by touching and rubbing on the rotor itself to create the necessary friction for stopping.  Break-in is much easier with this type.  
    • This type of pad is abrasive, and the rotors will wear much more rapidly - especially when they are cold.  
  • Adherent friction means that the brake pad is transferring a layer of pad material onto the rotor.   As a result, brake performance comes from pad material against pad material.  With this type of pad, rotor life is generally much higher.  Trail braking can be done very smoothly with this type.  
    • One negative with these types of pads is that bed-in is more difficult.  If you don't do it properly, an uneven transfer layer on the rotor will cause a vibration that appears to be 'warped' rotors.  Luckily you can clean the rotors of the uneven pad layer and start once again with proper bed-in.  We recommend purchasing pads of this type already 'Pre-bedded'.   

     Properly bedding your pads and rotors will greatly extend their life and give you maximum performance.  Follow the manufacturer's recommendations for best results.  I have also detailed our procedure below for adherent friction pads that we sell (G-loc):

    Proper bedding instructions for Street Compound (GS-1):

    1.      Brake from 60mph down to 30mph about 4-6 times.

    2.      Then let your brakes cool for about 2-3 minutes while driving.

    3.      Repeat step # 1.

    4.      Allow the brake pads and discs to cool down to ambient temperature (about 30 minutes or more).

    NOTE: Proper bedding of pads & rotors will result in greater performance and longer pad & rotor wear.

    Proper bedding instructions for Track or Race Pads (G-loc R8, R10, R12):

    1.      All new brake pads require a bedding process, start this process by pumping your brakes a few times to assure proper installation. Once on track perform several moderate (medium) near stops (to a very slow rolling speed) to thoroughly warm up the pads and rotors. This should take 1-2 laps. This allows a thin layer of the pad material to be transferred into the micro-grooves of the rotor.

    2.      After the pads/rotors are warm, perform a series of hard near stops (to a slow rolling speed) until some brake fade is felt. This process should take about 2-4 laps (depending on the track). Once this occurs, then stay off the brakes (as much as possible) and bring your car into the pits/paddock to completely cool. Do not lock the tires during this operation.

    3.      Allow brake pads and/or rotors to cool down to ambient temperatures; no less than 30 minutes. The total bedding procedure should not take more than 5-6 laps or about 10-15 minutes.

    NOTE: The proper way to bed your brake pads and brake discs (rotors) is to bed them on the racetrack, NOT on the street (excluding the GS-1 compound).  We know this is not always possible so please find an empty stretch of road.

    Warning: Failure to properly bed in your pads could lead to friction material to chunk and break up resulting in poor pad performance and pad life. Improper bedding can also lead to overheating your pads and causing them to glaze over resulting in the car not being able to stop or slow properly.

    Bedding procedure for brake rotors

    New discs (rotors) just like pads need to be bedded in. Proper bedding will increase the rotor life and make it more resistant to thermal cracking. Before installing the new brake discs (rotors), be sure to thoroughly clean discs with clean wipes and brake cleaner. By cleaning the disc surface you want to make sure you have completely removed any and all grease, surface residue, and debris that might contaminate or damage the brake pads. Once the discs (rotors) are installed on the vehicle perform the following procedure. Please note that you can bed new pads & discs (rotors) at the same time.

    1.      Start out with several near stops for the first 1-2 laps, while gradually increasing your speed and brake force with every stop.

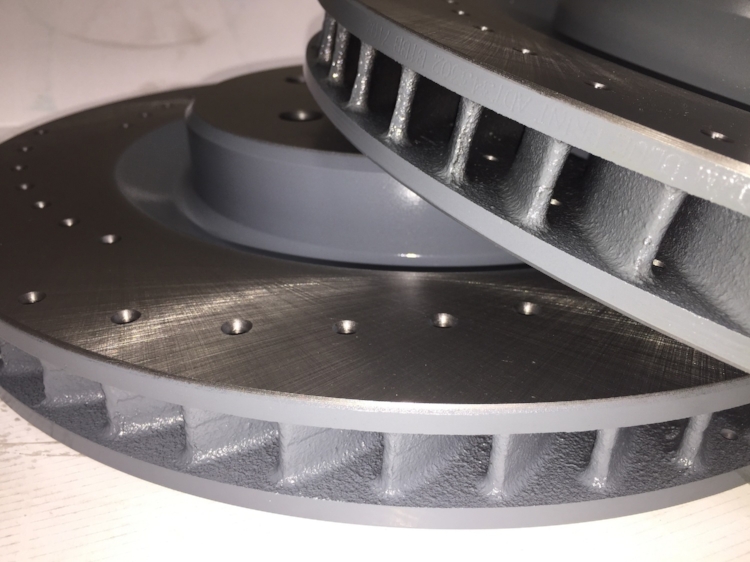
    2.      Next, do another 1-2 laps at normal speed followed by a cool-down lap. The gray coloration is the pad material depositing a transfer layer of material into the micro-grooves of the disc. This process is pinnacle in achieving the best performance and life out of the rotor.

    3.      Then allow rotor(s) to completely cool down to ambient temperature.

    Proper USED brake rotor bed-in procedures:

    1.      If rotors have been previously bedded with G-loc or Carbotech brake pads, then bedding the rotors again is not necessary.

    2.      If rotors were previously bedded using a different manufacturer’s brake pads; then it is strongly recommended that the used discs (rotors) be reconditioned/turned and meet minimum specification requirements.

    3.      Start out with several near stops for the first 1-2 laps, while gradually increasing your speed and brake force with every stop.

    4.      Next, do another 1-2 laps at normal speed followed by a cool-down lap. The gray coloration is the pad material depositing a transfer layer of material into the micro-grooves of the rotor. This process is pinnacle in achieving the best performance and life out of the rotor.

    5.      Then allow rotor(s) to completely cool down to ambient temperature.

    NOTE: Brake pads should be checked regularly. If pads are wearing evenly, then the pads can be used almost down to the backing plate.

    NOTE: Do not drag your brakes; meaning, do not continually drive around the track with applied pressure to your brake pedal. This does not bed brake pads and/or rotors properly. This can severely hurt the performance and life of your brake pads & rotors.

    Monday, June 25, 2018

    Even Stock Shocks Should be Rebuilt

    We know many of you are happy with the stock shock valving that came on your Lotus.  But all dampers need to be refreshed at some point.  Typically mileage is what most use to gauge when to replace them but age also plays a big role.  Since shocks degrade slowly and drivers unconsciously compensate, most don't realize that the suspension is not working as well as Lotus intended them to. 

    There is good news and bad news for those of you who want to stick with stock.  We now have stock of each of the varieties of dampers from Lotus.  We hired Bilstein to rebuild them to Lotus specs.  That is the good news.  You can also contact Bilstein like we did to get yours rebuilt but the lead time is 6-8 weeks.  If you don't want to have your Lotus down for that long, give us a call for a set.  We have them available for order on our website: HERE    

    Saturday, May 26, 2018

    Don't Drill Through Your SubFrame!

    We are not big proponents of permanently modifying street-legal cars.    Race cars are different animals so anything goes with them.  We serviced a car recently that had a competitive rear toe link installed.  What we found was troubling.  See the picture below. 

    As you can see, the hole that was drilled during installation is not centered.  Their kit requires drilling through the subframe and wishbone bushes to accommodate a larger bolt.  There is no good way to ensure that you will drill through the center of the bush - unless you remove it.  Clearly, this was installed by a shop that decided to drill the bush/wishbone while it was still in the subframe.  

    Additionally with this solution, you will never be able to return your subframe to stock as it will be permanently modified - which means diminished resale value.  We don't see any point in doing this as the marginally lower cost of their kit is clearly offset by the additional labor and future resale loss.

    missdrilled bush.jpg

    We are clearly biased as we sell bolt-in rear toe link braces that do not require such mods.  Have a look at our solutions before you permanently modify your car.  Find them: HERE

    We know that cars that don't have permanent mods tend to sell for higher premiums.  The closer the car is to stock, when you sell it, the more it will fetch.  We advocate installing only bolt-on solutions and retaining the stock parts just in case you plan to sell your car in the future.

    Tuesday, May 8, 2018

    Tire Selection Is Where The Rubber Meets The Road!

    Changing tires is something we must contemplate at some point.  Sportscars generally require this sooner than later.  Care must be taken or you can ruin the beautiful handling of your Lotus.  Tire selection is a very complex issue and not one that can be fully addressed in a short article.  Since your tire is what holds your car to the road, I thought it would be a good issue to discuss.

    Lotus ride & handling engineers work closely with tire manufacturers to develop the tires found on their cars.  The Elise with a Sport pack came with Yokohama AO48 tires.  They are a special tire compound (LTS) developed by Yokohoma for Lotus.  Car manufacturers buy thousands of tires so tire manufacturers are often willing to create special tires for the OEs.  This allows those crafty OE engineers to ‘fine-tune’ their cars. 

    The Elise came with two different suspensions: Standard and Sport that demanded different tires.  The Standard (there is no such thing as the ‘Touring’ suspension) suspension featured narrower front wheels with 175 front and 225 rear Yokohama AD07 tires.  The Sport packaged cars came with more aggressively tuned dampers with wider(front) forged wheels and stickier Yoko A048 r-compound tires in a 195 front and 225 rear.  These sizes and tires work as intended and few alternatives exist that deliver the same overall performance. So does this mean we should only use factory-approved tires?  No, you can veer from their spec tire but you need to go in with your eyes wide open. 

    What are the key areas that must be considered during tire selection?  Here is an abbreviated list - in no particular order:

    1.      Size

    2.      Compound

    3.      Brand/model

    4.      Vehicle weight

    5.      Availability


    Tire size is something that many people immediately begin experimenting with.  Oftentimes, a tire is available in a multitude of sizes and car owners believe they might try wider tires to create more grip.  This can work, but many times, it may deliver the opposite effect as the tires don’t get into their operating temperature range due to the low weight of our cars. 

    Lotus are lightweight, which narrows (pun intended) our tire options.  Lighter cars demand softer compound tires.  What works well on a 3300lb Corvette/BMW/Porsche will be hard as a rock on a Lotus.  You may have noticed that our street tires are considered track tires by those heavy-weight sportscars.  So your favorite aggressive street tire on your last GT3 may not work on your new Exige.  Of course, if you can go with even softer tires, wider widths are possible but the only tires that are softer tend to be non-street friendly tires.

    OE tire size is usually dictated by the weight distribution of a car.  Since modern Lotus are mid-engine cars, they have more weight in the rear which means wider tires are needed in the rear and narrower in the front.  On a car, like a BMW or Miata, with 50/50 weight distribution, you will often see owners running the same tires front to rear.  This will not work on our Lotus with a 40/60 weight balance.   Note the Elise/Exige has 195/225 tire size split or a 175/225.

    grripp.jpg

    The rabbit hole of tire knowledge sucks you in deeper when you start to consider tire temperatures.  Tires are designed to operate in a certain temperature range.  You have heard about accidents that occurred due to ‘cold’ tires.  Tires gain temperature due to friction as they are driven.  It is critical that they get within their operating range to work effectively.  If they are outside of this range, poor results can be expected.  Wider tires may not be able to achieve the temps required if all other variables, like car weight, remain the same.  The net result is a tire that grips even less than a narrower tire. 

    How about going with smaller rims and larger sidewall tires?  I introduced this idea ten years ago in an attempt to improve our compliance and grip on rough canyon roads.  Our Lotus friends in Japan showed me the way.  The 15”/16” rims work nicely in this environment but introduce several other issues that we can discuss in another article.  Most of you want to stick with stock-sized rims and need tires that are suitable. 

    Tire Grip Graph.jpg

    The graph above shows the lateral force curves generated by two different tires.  Both tires show a linear response initially and as the slip angle increases the lateral forces generated drop off.  The arrows define an area that is at the edge of grip or control for Tire A.  This is actually where the best race drivers operate their cars whilst dazzling us with their superior car control.  This curve is different for each tire size, compound, etc.  When you change the tire in your car, you need to be aware that you will be changing where your car will begin to lose grip.  So if your new tire can not generate enough heat, the curve will certainly be worse than stock.  If you choose a harder compound to get more life, the same result can ensue.  This is especially true with the front tires on a modern Lotus since they support less weight and are the ones that do all the turning!

    So what’s a poor Lotus owner, with worn-out tires supposed to do?  Here are my suggestions based on some assumptions that you:

    1.      Enjoy driving your car aggressively and occasionally at the limit

    2.      Want tires that fit within your wheel wells

    3.      Are not a part of ‘Stance Nation’

    4.      Have stock sized rims

    5.      Drive on the street

    My recommendations:

    1.      Buy stock sizes

    2.      Buy factory-recommended brands

    3.      Never split tire types – front to rear

    4.      Consider competitive brands in stock sizes and compounds

    • I am a big fan of the new Toyo R888R and the older R888 in 195/225 sizes

    5.      Call your local or not-local Lotus Specialist and pick their brain for advice.

    6.      Get your tires mounted/balanced correctly or you will really hate those tires!

    Wednesday, January 17, 2018

    Track Prep: Trilogy of Terror

    Not familiar with this 70s B-grade Horror flick?  It's bad.

    Not familiar with this 70s B-grade Horror flick?  It's bad.

    The Elise & Exige can be a very fun track day car.  We believe that prepping the car does not require much investment but it is something that is required.  There are three areas that need to be addressed if you plan to track your Lotus Elise/Exige.  These three areas will keep your car running safely and reliably.  They are:

    1. Rear Toe Link
    2. Oil Starvation
    3. Fuel Starvation

    Each of these can be addressed with parts, or in some cases with additional maintenance scrutiny.  Let's discuss each in more detail.

    FUEL STARVATION

    One fast long sweeper that Lotus car fuel starve.  The factory fuel tanks are not baffled which results in fuel sloshing away from the fuel pick up.  There are two fixes that we like:

    1. Keep your fuel tank full
    2. Baffled Fuel Tank

    The cheapest solution is to simply top off your fuel tank BEFORE every track session.  Some cars with even 1/2 tank of fuel have starved.  If you prefer to run a light fuel load (AutoX or Time Trials) then our V2 Fuel Tank is a great solution.  See the picture below:

    stock vs V2.jpg

    We know that there are other solutions on offer like fuel surge tanks.  We are not big fans of these as they do not fix the problem at the source.  They also cut into fuel lines and create another area for failure.  We know of at least 2 cars that have burned to the ground from surge tank-related failures.  Why take the chance when you can fix the issue safely?

    REAR TOE LINKS 

    We know the rear toe link joint is a weak point in the Elise/Exige - mostly with track-driven cars.  There is a misconception that the toe link is weak - it is actually the joint where the stock balljoint meets the subframe.  This joint can get loose and then the balljoint stud will start to neck and shear off.  When this happens, you will lose control of your car as the rear toe will move wildly.   This joint is in Single Shear which is not ideal. 

    The low-cost solution is to check the torque on the nut that holds this balljoint to the subframe.  We like to torque it to spec and then paint market it.  This was you can visually inspect this before and during each event.  The safest solution is to upgrade into a rear toe link brace.

    Over the years, we have developed several of these braces, including the DSbrace, TLUkit, RTDbrace, and RTD2brace.  These bolt-in solutions require no modifications and place the joint into Double Shear.  As a result, we have created a significantly stronger joint.  

    installed.jpg

    The easiest way to explain the differences between Double & Single Shear is to think of when you were a child and fighting over a stick or piece of wood with a friend.  He grabs one end, trying to pull it out of your hands, the stick starts to go back and forth, you can hear it starting to crack and then you grab the other side of the stick putting his hand in the middle of your hands. He keeps pulling as hard as he can, but you have full control and there is no more tension on the stick. His force with one arm is now dominated by the strength of your two arms. Now, replace the stick with a bolt, and you and your friend's arms are metal rods. The same applies to the bolt as it would the stick. 

    The strength of a Double Shear joint is effectively double that of a Single Shear joint.  Here is a picture that helps illustrate the shearing actions:

    shear.png

    OIL STARVATION

    Much like fuel starvation, engine oil is another area of concern on a Lotus.  These cars can easily pull 1g in a corner with stock tires.  Couple that with a long fast sweeper with an unbaffled oil pan and you will run the risk of damaging your engine. 

    A simple low-cost solution that can work for casual track day drivers is to overfill the oil pan with a bit more oil.  Though this can work for someone running for the first time, some starvation can still occur if you are capable of maintaining sustained g loading.  Even short periods of starvation will slowly chip away at your engine resulting in eventual failure.  For a more permanent fix, we suggest a baffled oil pan.

    A baffled oil pan like our gPAN3 has proven to be the solution to this problem.  Especially if you are running in an Intermediate group or slicks or heavy downforce.  There are hundreds of owners running these baffled pans with great results.  Dry sump solutions are the most awesome solution but are far more complex and not a street-friendly solution.

    Tuesday, January 9, 2018

    Testing: Stock Front Swaybar + Rear Swaybar

    We needed to determine whether or not a factory front bar would work with our new Rear Swaybar.  I was a bit skeptical as the torsional stiffness numbers did not suggest that it could work with stock settings.  So I decided to stiffen the stock swaybar using a trick we have used for many, many years.  We drilled an additional hole to effectively stiffen the front swaybar.  Lucky for us, the factory bar has enough real estate that we can safely do this - as we have since 2005.  8^)

    srockDRILLED.jpeg


    We set the rear swaybar to the softest setting and went out for a road test.  The balance was good.  Turn-in was not as quick as it was previously but the car handled nicely.  I stormed through my favorite test canyon with this setup.  The car has also been running a new calibration for our KATANA2 kit so it felt especially quick.  Frankly, this made the handling even more critical.  Our suspension remained compliant in the street settings and with the redrilled stock front swaybar, I was very happy with the car's performance.  I did not run it in the stock hole setting as our new settings felt 'just right'.   If you have a yellow factory adjustable front swaybar, the tuning possibilities will be even better. 

    Photo Dec 19, 5 21 58 PM.jpg

    I can confidently recommend our rear swaybar to anyone with any factory front bar.  If you are willing to drill the stock non-adjustable bar, you will have a good balance.  One advantage is that you can run your stock suspension and get the benefit of a flatter handling car with the addition of our Rear Swaybar.   No need for new dampers - unless yours are worn out.

    drilled hole.jpg